

I will be drawing a camera, but these techniques will be the same for drawing practically anything...
Start off by sketching out your basic design. Don't worry about making the lines perfect- just quickly sketch out where things will be using as many lines as you need. I start by sketching the largest part of the thing I'm drawing, so in this case the main body of the camera. Then I will have a reference to add the details such as buttons or the camera lens.
Click here to see a tutorial on how to set up perspective, line thicknesses and how to draw basic shapes if you are unsure of how to do it. I recommend this for people who are still beginners...


Now you can start drawing good quality, smooth lines- all the while using the rough sketch lines as reference. DO NOT draw the lines slowly or in small increments- they WILL look wobbly and inconsistent if you do. Instead, draw the line in one quick 'flick' like motion of the pen. Make the line a lot longer than it needs to be and then trim the line back, keeping the section that you need. This will result in a consistent and straight line. It will take a few tries to get each line at the perfect angle, just hit 'ctrl + z' and try again.
Over-drawing and trimming back the line will also work well for curves- draw them in one quick motion. Practice drawing the line until it looks right. With more practice you will get to the stage where it only takes one or two attempts to get the line right (I'm sure not there yet!). Just keep practicing and it will quickly get easier as you go.
 |
| I changed and went for a chamfer as it suited the design better. |

I used an ellipse tool to draw the camera lens as it is impossible to draw perfect ellipses by hand. With enough practice, it is possible to draw smooth ellipses. I recommend drawing a bunch of different angled ellipses on a sheet of paper at least once a week to get good at it.

Erase any unnecessary overlapping lines. Only keep the lines that you will see once colour is applied. I recommend having a physical sample (not photo) of what you are drawing to refer to if you are unsure of how the lines go. Remember to check out my other tutorial (click here), which includes a step by step video, if you are unsure on how to draw lines and what thickness they should be.


Using the path tool, trace over the ellipse where necessary to make your thicker lines (remember- any edge that has only one visible face is a thick line. Any edge where two or more faces are visible will be a thin line). I then rotated the ellipses so that they follow the perspective. A good rule of thumb for giving an ellipse correct perspective is to draw a vertical line through the center of the ellipse. Then rotate the ellipse so that the line is at a right angle to the perspective lines.
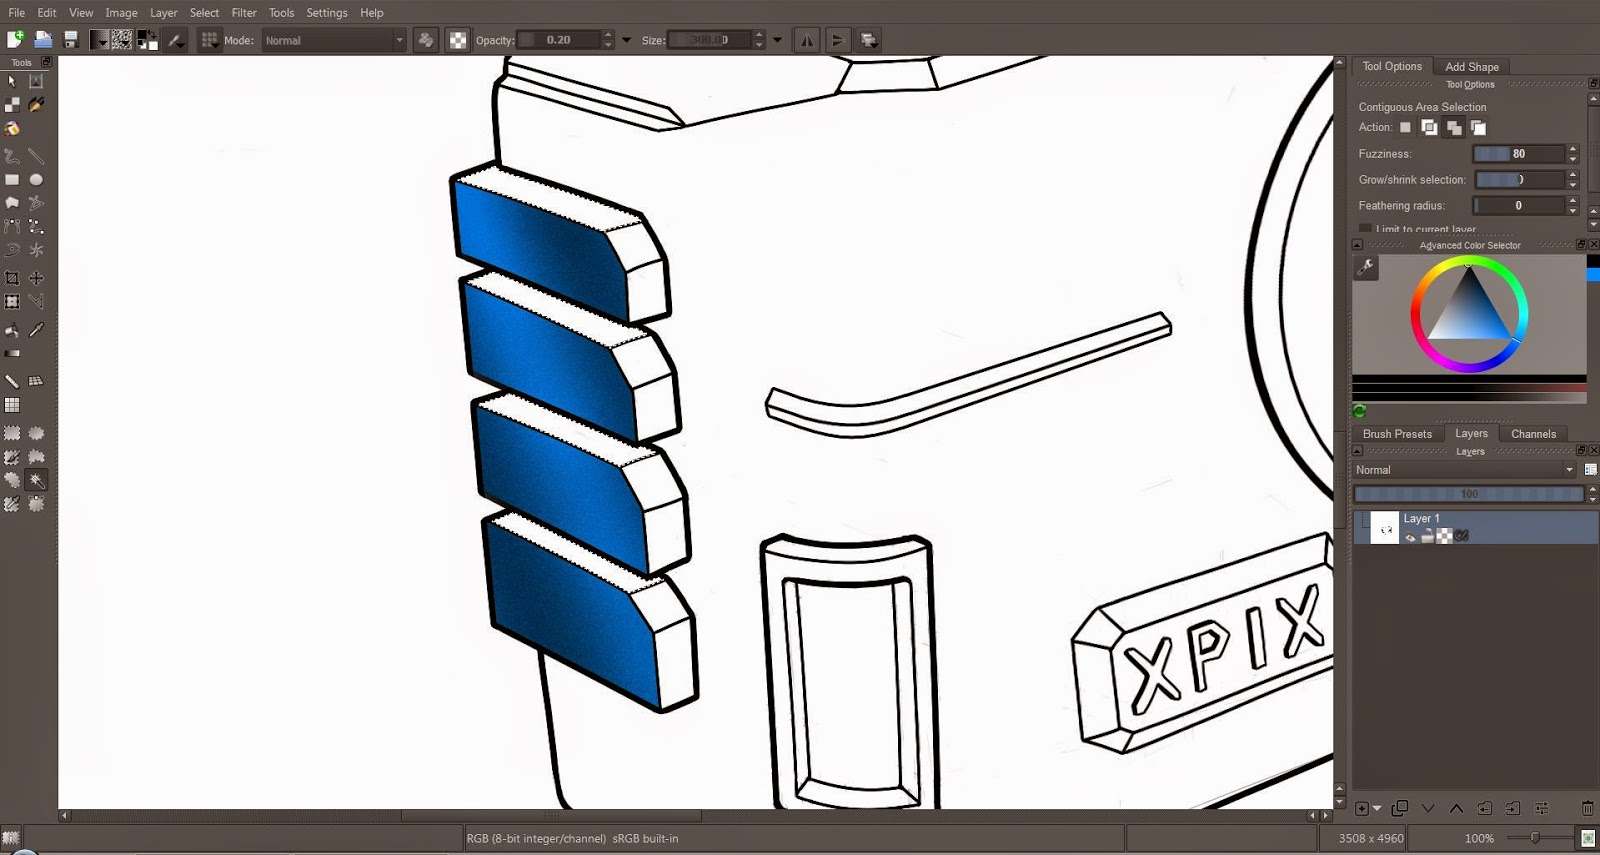
Once you have all of your lines, we can start adding colour. Use the magic wand tool to select each face that you will be adding colour to. For example, in the above screenshot I selected the four parallel faces of the buttons. As you can see above, I went ahead and used a 'airbrush' brush to apply a solid blue colour. Then I used a 'textured airbrush' brush to apply black shading.

Keep adding colour to the drawing. If you are unsure of where the colour and shading goes, look at the object in real life. Study it- look for the highlights and shading and colour. Generally though, you will want to add darker shading to all faces that are facing the left of the screen and lighter shading to all faces facing the right. Add very light shading to any face facing up. Add highlights (strips of very light colour) to any corner or curved face.

Here is a good tutorial on adding shadows to your drawings. Do not underestimate or skip on shadows. They are subtle yet give a great sense of realism to drawings. See the diagram below...
 |
| This diagram pretty much sums up how to draw shadows. |
With practice, the final result should be quite impressive and not take a lot of time to do. Drawing will become fluid and require no 'guesswork' once you learn to draw using these techniques.
Have a question? Post it in the comments section and I will be sure to get back to you in less than one day.
Thanks for reading.
No comments:
Post a Comment